
Your phone rings at 9 PM. A customer needs emergency AC repair - their system died in 95-degree heat. You're at dinner, and the call goes to voicemail. They call the next contractor. You just lost a $3,500 job.
In our analysis of 130,175 customer service calls from 45 home services contractors over 7 months, 74.1% went completely unanswered. That's three out of every four potential customers calling someone else.
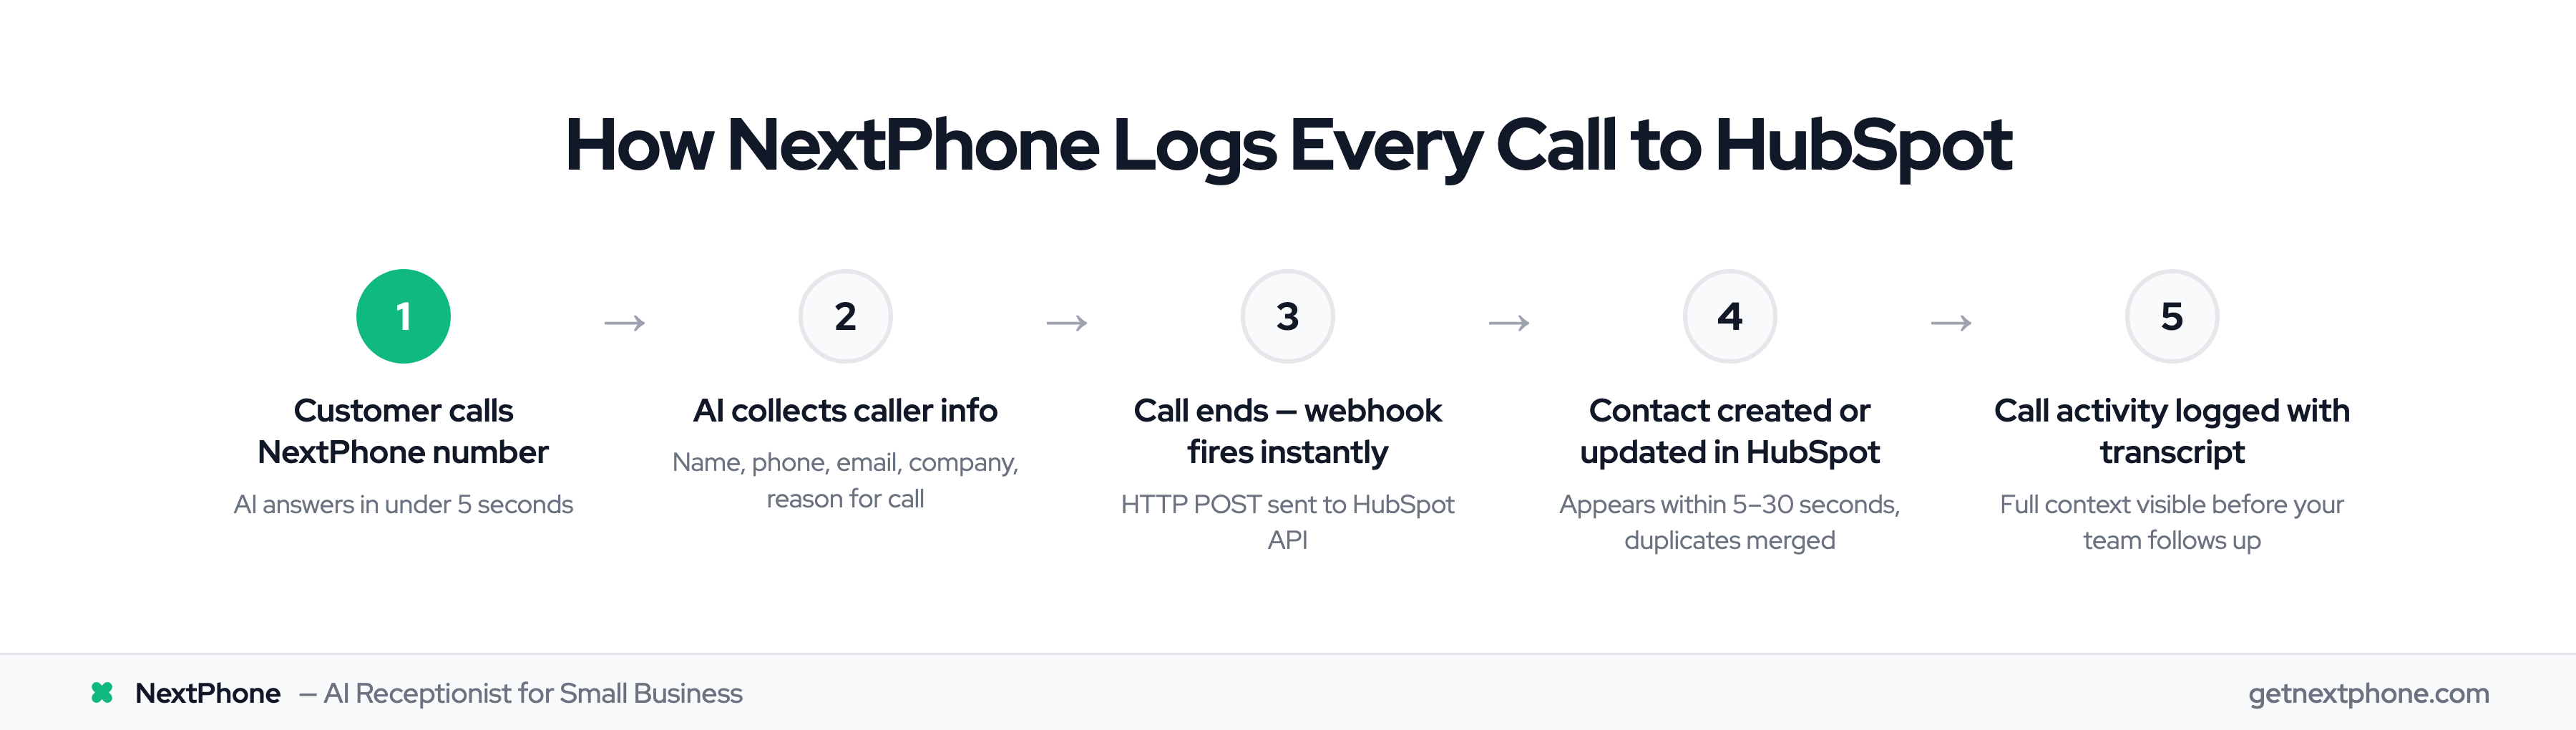
HubSpot's State of Service report surveying 1,500+ CS leaders shows that CRM integration is essential for customer experience. Even when you answer calls, if they're not logged in your CRM, you're operating blind. No call history, no follow-up reminders, no way to track which leads convert. Integrating NextPhone with HubSpot changes this. Every call handled by your AI virtual receptionist creates a contact, logs activity with full transcript, and creates deals for qualified leads - automatically.
This guide walks you through the complete setup process, focusing on preventing the most common integration errors: field mapping mistakes that cause data loss or failed syncs.
Ready to capture every lead in HubSpot? See how NextPhone's HTTP webhooks work.
Why Integrate NextPhone with HubSpot CRM?
CRM integrations save sales teams 4 hours per week per rep and deliver $8.71 ROI per dollar spent. If you're evaluating options, our CRM phone integration guide covers the full landscape. The average home services contractor receives 42 calls per month. With a 74.1% miss rate, that's 31 missed opportunities every month. Without CRM integration, even the calls you do answer might not get logged properly.
Automatic Lead Capture

Every call to your NextPhone number automatically creates a contact in HubSpot. The AI receptionist collects caller information during the conversation - name, email, phone, company, reason for calling - then pushes all that data to HubSpot via webhook the moment the call ends.
No more writing notes on paper scraps. No more "I'll add them to the CRM later" that never happens. It's automatic.
In our data, 25.4% of callers explicitly requested callbacks. Without a tracking system, most of those callback requests fall through the cracks. With HubSpot integration, every callback request is logged with timestamp, phone number, and context.
Complete Call History
The integration doesn't just create a contact - it logs the entire call as an activity. You get:
- Full call transcript
- Call duration
- Timestamp
- Caller intent (quote request, emergency, question, etc.)
- Any information the AI collected
When your sales team follows up, they see the complete context. No more calling back and asking "What did you need?" when the customer already explained it.
Sales Pipeline Visibility
For qualified leads, the integration can automatically create deals in your HubSpot pipeline. Customer calls requesting a quote? Deal created. Emergency repair needed? High-value deal tagged as urgent.
15.9% of calls in our analysis contained urgency language like "emergency," "urgent," or "ASAP." These emergency calls average $4,200 in revenue - significantly higher than routine work. The integration ensures these high-value opportunities are flagged in your pipeline immediately.
ROI: Capture just 3 extra jobs per month at an average $3,500 value. That's $10,500 in additional revenue versus $199/month for NextPhone - a 5,200% ROI.
The integration lives inside your existing workflow. Your team keeps using HubSpot exactly as they do now - they just see more complete data.
Want to learn more about how the AI receptionist collects caller information? The AI asks custom questions you configure, making every data point in HubSpot accurate and actionable.
Prerequisites - What You Need Before Starting
Before you start configuring the integration, make sure you have:
HubSpot Account Requirements
- Active HubSpot account (free tier works for basic contact creation)
- Pro or Enterprise plan recommended for workflows and advanced deal automation
- Admin or Super Admin permissions
- Ability to create private apps and generate API keys
NextPhone Account Setup
- Active NextPhone account
- Access to HTTP webhook integration feature
- Your business configured with AI assistant
All NextPhone plans include HTTP webhook integrations. Check NextPhone pricing for plan details.
Access and Permissions
You'll need permission to:
- Create private apps in HubSpot
- Generate API keys
- Create custom properties (optional, but recommended)
Note: Data sync can take anywhere from a few minutes to a few hours depending on the amount of data in your CRM. Plan your initial setup during a low-traffic period if possible.
Time needed: 15-20 minutes for initial setup, plus testing time.
Step 1 - Get Your HubSpot API Key
HubSpot uses private apps to grant external systems access to your CRM. You'll create a private app for NextPhone and generate an API key.
Navigate to Private Apps Settings
- Log in to your HubSpot account
- Click the settings icon (gear) in the top right
- In the left sidebar, navigate to Integrations — Private Apps
- Click Create a private app
Create a New Private App
Give your app a clear name: "NextPhone Integration"
Add a description (optional): "HTTP webhook integration for automatic contact creation and call logging from NextPhone AI receptionist"
Configure Required Scopes
Under the "Scopes" tab, you need to grant permissions for the integration to work:
Required scopes:
crm.objects.contacts.write- Create and update contactscrm.objects.contacts.read- Read contact data for duplicate detectioncrm.objects.deals.write- Create deals (if using deal automation)crm.objects.companies.write- Create companies (optional)
Select each scope by checking the corresponding box.
Generate and Copy API Key
- Click Create app in the top right
- HubSpot will show you the access token (API key)
- Copy this key immediately - you'll only see it once
- Store it securely in a password manager
Security note: Never share API keys in emails, commit them to version control, or post them in support tickets. Treat them like passwords.
IMAGE PLACEHOLDER: Screenshot of HubSpot private app creation screen showing scopes selection and API key generation
If you need more detail, see HubSpot's API authentication guide for the official reference.
Step 2 - Configure NextPhone HTTP Webhook
This is the most critical step. Field mapping errors are the #1 cause of integration failures. According to research on common integration mistakes, "incorrect, incomplete, or missing property mapping is one of the most common integration mistakes, producing inaccurate values, broken segments, and misleading reports."
We'll walk through exactly which fields to map and how to avoid common errors.
Access HTTP Webhook Settings
- Log in to your NextPhone dashboard
- Navigate to Integrations — HTTP Webhooks
- Click Create New Webhook
Configure Webhook URL and Headers
Webhook URL:
https://api.hubapi.com/crm/v3/objects/contacts
HTTP Method: POST
Headers:
Add two headers:
-
Authorization
- Value:
Bearer YOUR_API_KEY_HERE - Replace
YOUR_API_KEY_HEREwith the API key you copied from HubSpot - Make sure to include the word "Bearer" followed by a space
- Value:
-
Content-Type
- Value:
application/json
- Value:
IMAGE PLACEHOLDER: Screenshot of NextPhone HTTP webhook configuration showing URL, method, and headers
Map Template Variables to HubSpot Fields
This is where field mapping happens. NextPhone collects data during calls using template variables. You map those variables to HubSpot properties.
NextPhone Template Variables Available:
- [caller_number] - Caller's phone number
- [first_name] - Caller's first name (collected by AI)
- [email] - Caller's email (collected by AI)
- [company_name] - Caller's company (collected by AI)
- [message] - Call summary/notes generated by AI
HubSpot Contact Properties:
HubSpot has hundreds of fields, but you only need a few core ones:
firstname- First namelastname- Last namephone- Phone numberemail- Email addresscompany- Company namenotes- Notes/description
Required vs Optional Fields
Required fields (at least one from each group):
- Name:
firstnameORlastname(at least one required) - Contact method:
phoneORemail(at least one required)
Optional but recommended:
company- Helps with B2B lead trackingnotes- Call summary provides context for follow-uphs_lead_status- Set to "NEW" for new leads
Complete Webhook Payload Example
In the NextPhone webhook body template, use this JSON structure:
{
  "properties": {
    "firstname": "[first_name]",
    "phone": "[caller_number]",
    "email": "[email]",
    "company": "[company_name]",
    "notes": "Call received: [message]"
  }
}
This payload maps:
- NextPhone's [first_name] — HubSpot's
firstname - NextPhone's [caller_number] — HubSpot's
phone - NextPhone's [email] — HubSpot's
email - NextPhone's [company_name] — HubSpot's
company - NextPhone's [message] — HubSpot's
notes
Common Field Mapping Errors to Avoid
Error #1: Using Display Names Instead of API Names
HubSpot shows friendly names like "First Name" in the UI, but the API uses internal names like firstname (no space, lowercase).
- Wrong:
"First Name": "[first_name]" - Right:
"firstname": "[first_name]"
Find internal property names by going to Settings — Properties — Search for the property — Look for the "Internal name" field.
Error #2: Mapping Picklist Fields to Text Values
If you create custom HubSpot properties, don't map a text variable to a dropdown (picklist) field. As noted in integration error research, "mapping a picklist to a text property will trigger errors or data loss."
Error #3: Forgetting Required Fields
HubSpot requires at least one name field (firstname or lastname) and one contact method (email or phone). Missing both will cause a 400 error.
Error #4: Incorrect Authorization Header
The header must be exactly: Bearer YOUR_API_KEY
- Wrong:
YOUR_API_KEY(missing "Bearer") - Wrong:
Bearer: YOUR_API_KEY(don't include colon) - Right:
Bearer YOUR_API_KEY(space after Bearer)
Follow these field mapping best practices to plan your data mapping before configuring the webhook.
Step 3 - Contact Creation and Sync
Once your webhook is configured, here's what happens automatically:
How Contact Creation Works
- Customer calls your NextPhone number
- AI receptionist answers and engages in conversation
- AI asks configured questions and collects information
- Call ends
- NextPhone webhook fires immediately
- HTTP POST request sent to HubSpot with contact data
- Contact appears in HubSpot within 5-30 seconds
You don't do anything. It's completely automatic.
Duplicate Detection
HubSpot is smart about duplicates. When the webhook sends contact data, HubSpot checks if a contact with that email or phone number already exists.
If contact exists: Updates the existing contact with new call data
If contact is new: Creates a new contact with all mapped properties
This prevents duplicate contacts from cluttering your CRM. However, duplicate detection only works if you're consistently sending the same identifier (email or phone). If a caller provides a different email on each call, HubSpot treats them as separate contacts.
See how HubSpot handles duplicates for more detail on the deduplication logic.
Contact Property Updates
When an existing contact calls again, the webhook updates their contact record with the latest call information. The notes field appends new call summaries, building a complete interaction history.
IMAGE PLACEHOLDER: Screenshot of newly created contact in HubSpot showing name, phone, email, and call notes populated from NextPhone webhook
Example: John Smith calls on Monday requesting a quote. Contact created in HubSpot. He calls again on Wednesday with questions. Contact updated with new call notes. Your sales team sees both conversations in one timeline.
Step 4 - Automatic Deal Creation
Contact creation alone is valuable, but deal automation takes it further. You can configure NextPhone to create deals in your HubSpot pipeline when callers express buying intent.
When to Create Deals Automatically
Create a deal when:
- Caller requests a quote or estimate
- Caller expresses interest in a specific service
- Caller mentions a budget or timeline
- Call is flagged as an emergency (higher value)
You configure the AI to detect these triggers. When detected, a second webhook fires to create the deal.
Configuring Deal Webhooks
Similar to contact creation, but using a different endpoint:
Webhook URL:
https://api.hubapi.com/crm/v3/objects/deals
Headers: Same as contact webhook (Authorization + Content-Type)
Body template:
{
  "properties": {
    "dealname": "New lead from [caller_number]",
    "dealstage": "appointmentscheduled",
    "pipeline": "default",
    "amount": "3500",
    "closedate": "2025-12-31"
  }
}
You can also collect the deal amount during the call. Configure the AI to ask: "What's your budget for this project?" Then map the response to [budget] and use it in the deal webhook.
Deal Stage and Pipeline Assignment
Map deals to the appropriate stage in your pipeline:
- Lead - Initial inquiry, not qualified yet
- Appointment Scheduled - Caller booked a consultation
- Quote Sent - Estimate provided
- Negotiation - Discussing price/terms
Set the default stage based on call outcome. For example, if the caller books an appointment during the call, set dealstage to appointmentscheduled.
6.2% of calls are true emergencies in our data. These are often high-value, time-sensitive opportunities. You can create a custom deal stage called "Emergency" and flag these for immediate attention.
IMAGE PLACEHOLDER: Screenshot of deal created in HubSpot pipeline showing deal name, stage, amount, and associated contact
Example: Homeowner calls about a burst pipe. AI detects urgency ("water everywhere," "emergency"). Deal created automatically: "Emergency - Burst Pipe Repair" with $4,200 estimated value (average emergency call value from our data). Deal appears in your pipeline tagged as urgent. Your team sees it immediately and prioritizes the follow-up.
Reference the HubSpot Deals API documentation for all available deal properties.