Your business phone number is everywhere. It's on your trucks, your business cards, your Google Business Profile, and years of marketing materials. You can't just change it. Too much is tied to that number.
Good news: you don't have to.
Phone number porting lets you keep your existing number while moving to a new provider, whether that's a voice AI receptionist, a new VoIP system, or a different carrier entirely. Your number stays the same. Your customers dial the same digits they always have. The only thing that changes is what happens when they call.
The catch? Porting has paperwork, timelines, and potential pitfalls. Get it wrong and your port gets rejected. Get it right and the transition is seamless.
This guide walks through the entire process: what you need, how long it takes, common mistakes, and how to ensure zero downtime during the switch.
What Is Phone Number Porting?
Phone number porting is the process of transferring ownership of a phone number from one carrier or provider to another.
When you port a number:
- Your number stays exactly the same: no change in digits
- Ownership transfers from old provider to new provider
- You can cancel your old service after the port completes
- Callers experience no change: they dial the same number
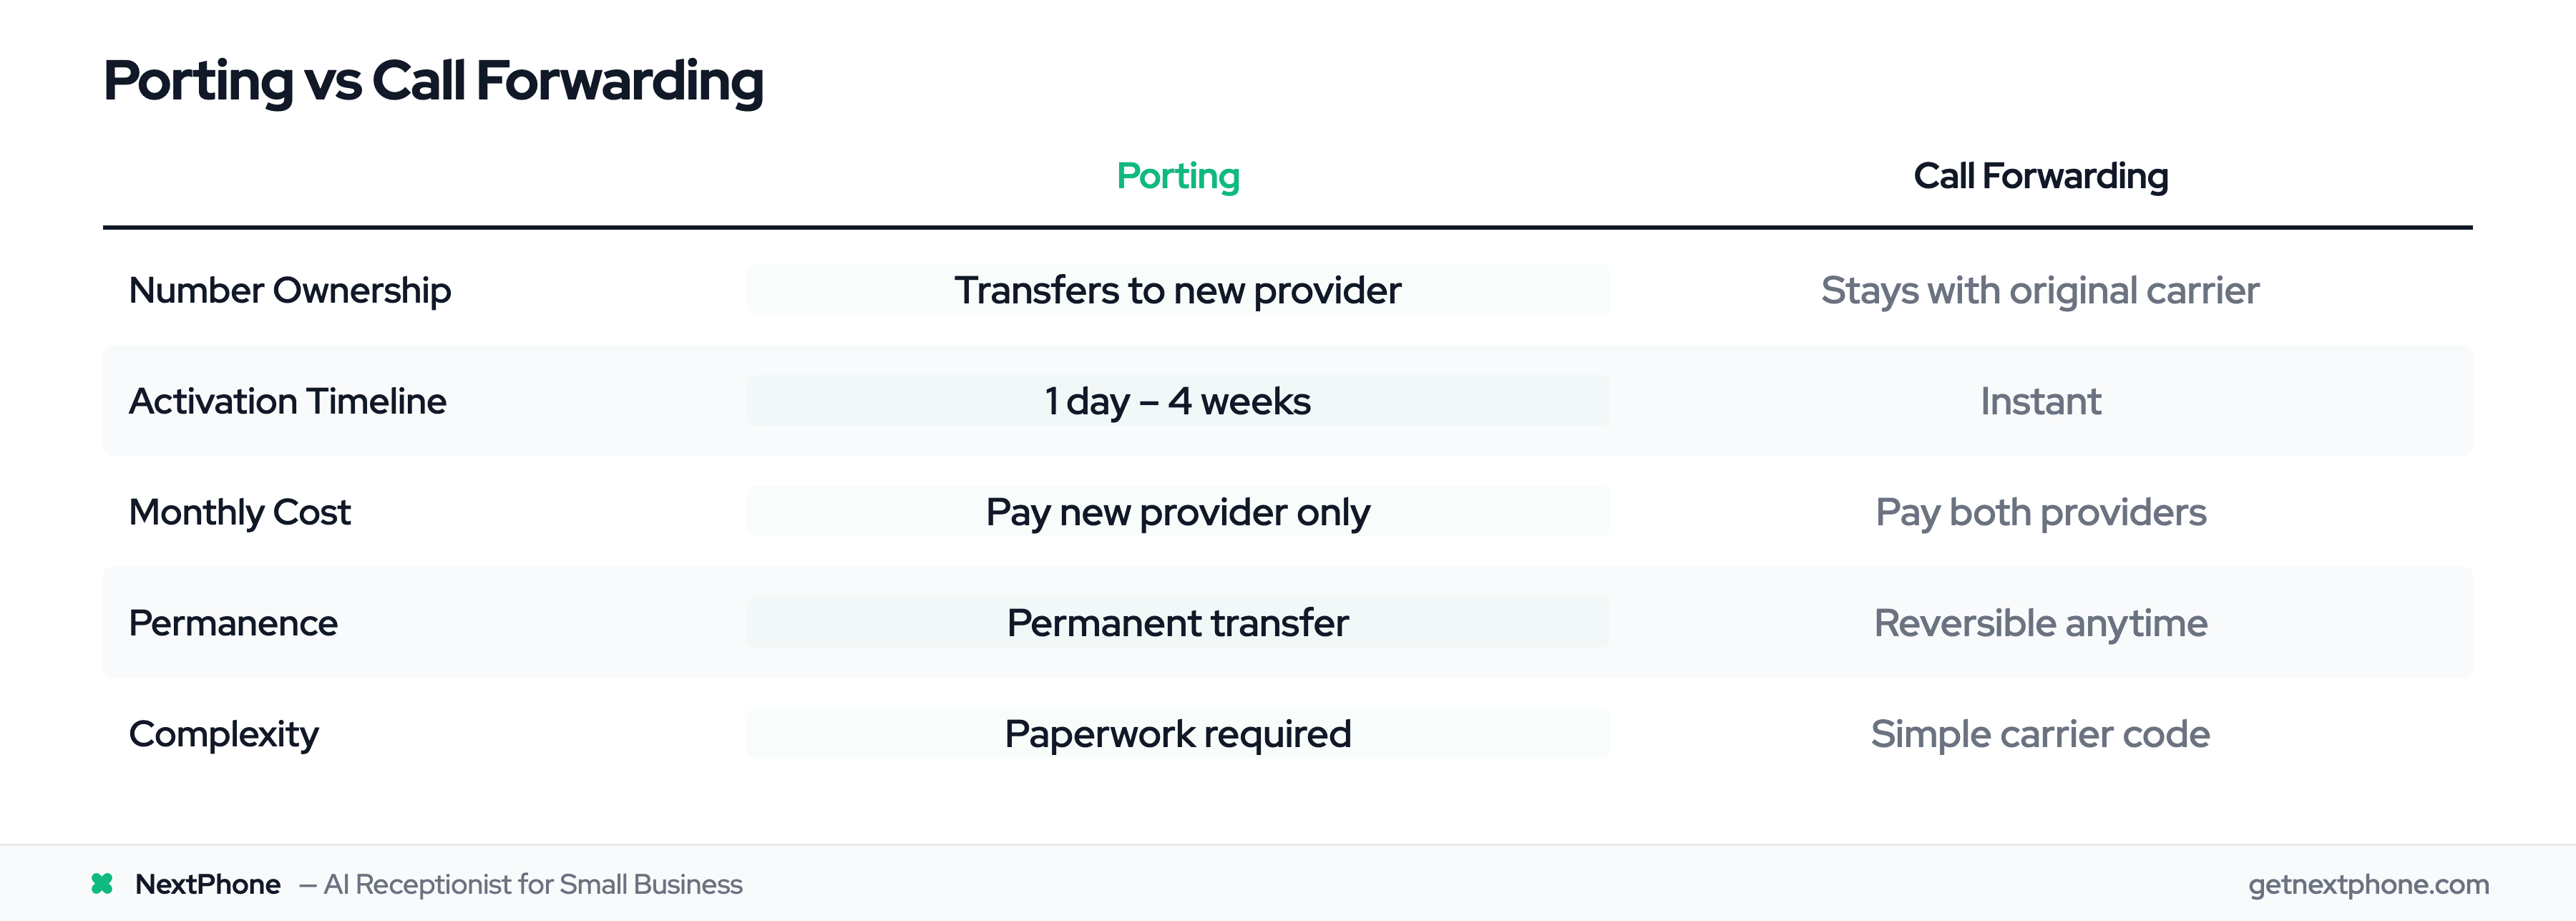
Porting is different from call forwarding. With forwarding, you keep your old carrier and simply redirect calls to another number. With porting, you move the number itself to the new provider.
The FCC (Federal Communications Commission) regulates number porting in the United States. Carriers are required to allow customers to port their numbers to other providers; they can't refuse. This applies to landlines, mobile numbers, and VoIP numbers.
Porting vs Call Forwarding: Which Do You Need?
Before diving into porting, make sure it's the right choice for your situation.
| Factor | Porting | Call Forwarding |
|---|---|---|
| Number ownership | Transfers to new provider | Stays with original carrier |
| Activation timeline | 1-4 days to 2-4 weeks | Instant |
| Monthly cost | Pay only new provider | Pay both providers |
| Permanence | Permanent transfer | Reversible anytime |
| Complexity | Paperwork required | Simple carrier code |
When to Port
Port your number if:
- You're making a permanent switch to a new provider
- You want to cancel your current carrier and stop paying them
- You want simplified billing with just one provider
- You're confident in your new service and don't need to test first
When to Use Forwarding Instead
Use call forwarding if:
- You want to test your new AI receptionist before committing
- You're still under contract with your current carrier
- You need the switch to be instant (no waiting for port approval)
- You want the flexibility to reverse the change easily
Many businesses start with forwarding to test their AI receptionist, then port after they're confident in the new system.
What You'll Need to Port Your Number
Porting requires specific information that matches exactly what your current carrier has on file. Mismatches are the #1 reason port requests get rejected.
Required Documents and Information
1. Account Number Found on your phone bill from your current carrier. This is the account number for your phone service, not your payment method.
2. Account PIN or Password The security code for your account. If you don't know it, call your current carrier to reset it before submitting a port request.
3. Service Address The address associated with your phone number. This may be different from your billing address. Use the service address (physical location where the line is installed), not the billing address.
4. Authorized Account Holder Name The name on the account. The port request must be submitted by (or authorized by) this person.
5. Letter of Authorization (LOA) A signed document authorizing the new provider to port your number. Your new provider will supply this form. You just need to sign it.
Pre-Porting Checklist
- Locate your most recent phone bill (last 30-60 days)
- Find your account number on the bill
- Confirm or reset your account PIN
- Verify the service address on file
- Confirm the authorized account holder's name
- Complete and sign the LOA from your new provider
Pro tip: Before submitting your port request, call your current carrier and confirm all details match their records. Ask them to read back the account number, service address, and authorized name. This five-minute call can prevent days of rejection delays.
How to Port Your Number: Step by Step
Follow this process for a smooth port:
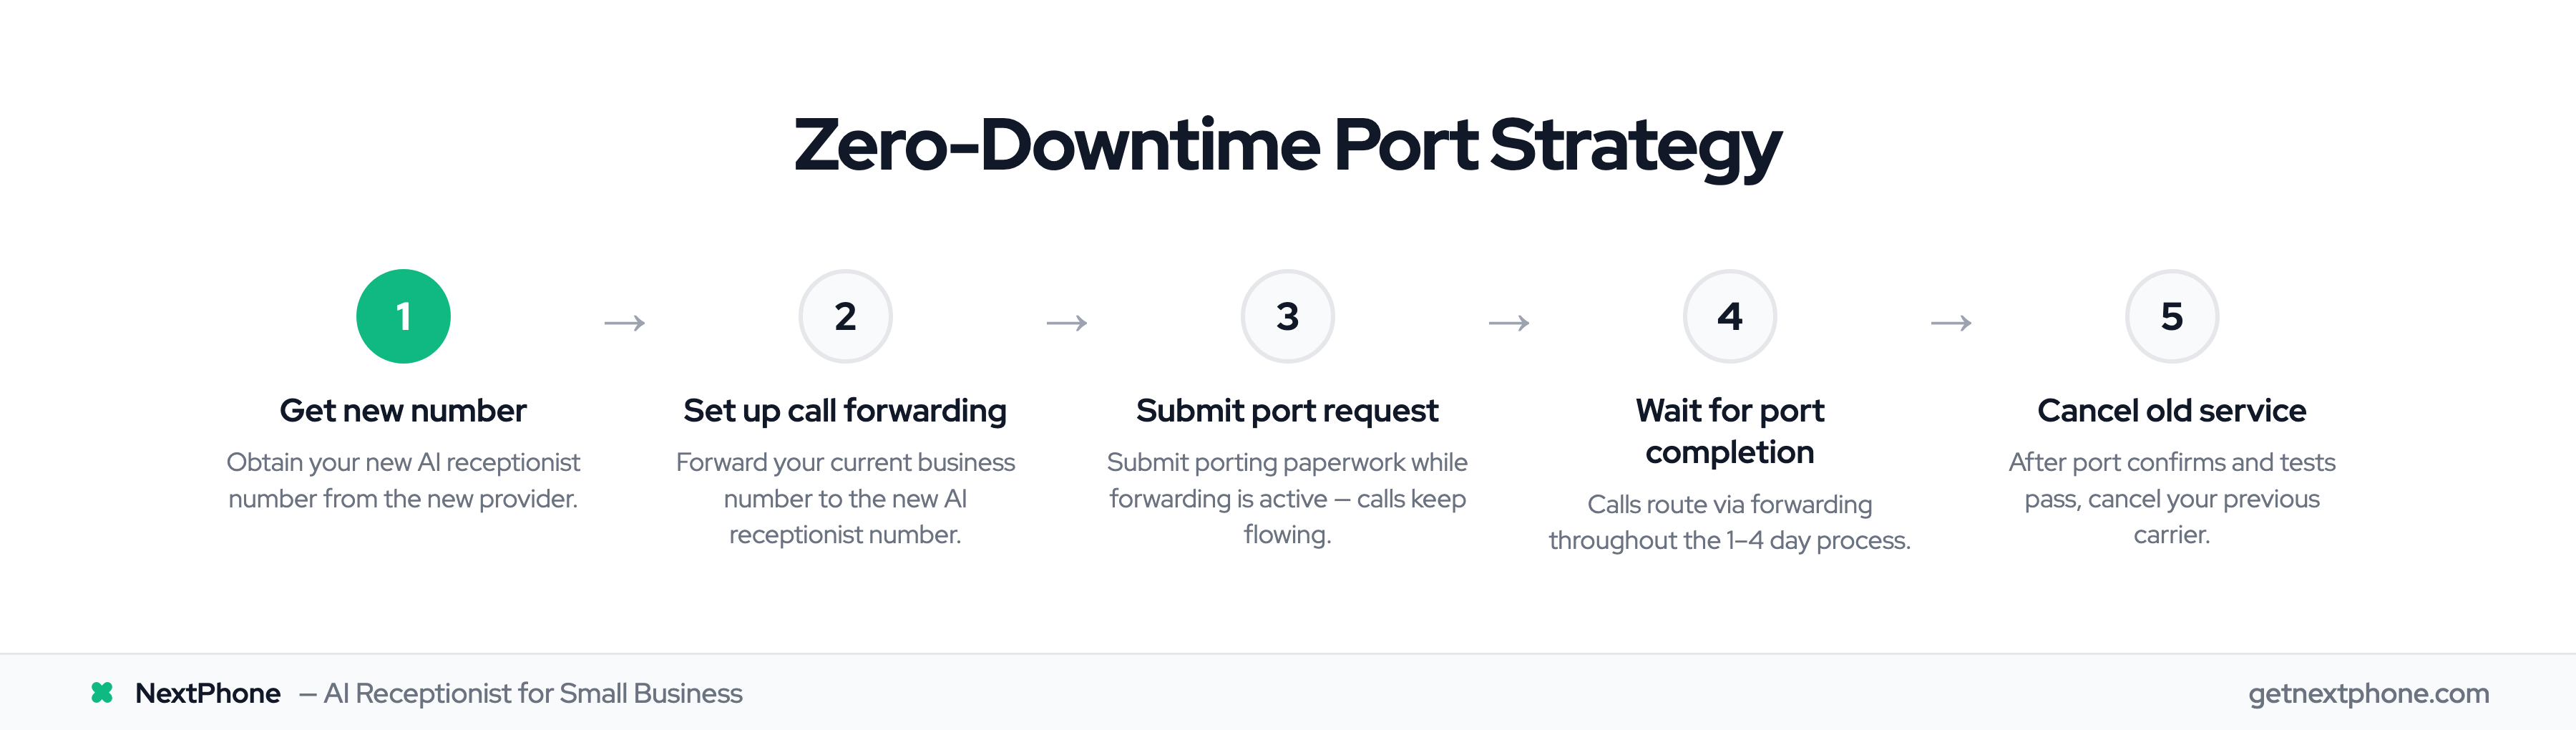
Step 1: Gather Your Information
Collect everything from the checklist above. Having accurate information before you start prevents rejections.
Step 2: DO NOT Cancel Your Current Service
This is critical. Your phone number must be active with your current carrier to port. If you cancel first, the number is released and becomes unavailable: you cannot port it.
Keep your old service active until the port completes. Yes, this means potentially paying for a few days of overlap. It's worth it.
Step 3: Submit the Port Request
Complete the port request form with your new provider (NextPhone, for example):
- Enter your phone number
- Provide account number and PIN
- Enter service address exactly as it appears on your bill
- Upload or complete the Letter of Authorization
- Submit the request
Step 4: Wait for Processing
After you submit, your new provider forwards the request to your current carrier. The current carrier verifies the information and either approves or rejects the port.
You'll receive:
- Confirmation that the request was submitted
- Estimated completion date
- Updates if any issues arise
Step 5: Port Completion
When the port completes:
- Your number now routes to your new provider
- Your old carrier may send a notification
- Calls to your business number now go to your new system
Test immediately: call your number from a different phone and confirm your new system (AI receptionist) answers.
Step 6: Cancel Your Old Service
After the port is confirmed and tested, you can cancel your old carrier account. Some carriers automatically close the account when the number ports; others require you to explicitly cancel.
Check with your old carrier to ensure:
- No further bills will be sent
- Any remaining balance is settled
- Equipment (if any) return requirements are clear
How Long Does Porting Take?
Timeline varies based on complexity:
Simple Ports: 1-4 Business Days
Most small business ports fall into this category:
- Single phone number or just a few lines
- Standard business or residential account
- No unusual equipment or configurations
FCC rules require carriers to complete "simple" ports within one business day. In practice, 1-4 days is typical.
Standard Ports: 5-10 Business Days
Slightly more complex situations:
- Multiple lines (5-20)
- Some carrier-specific processing requirements
- Older account configurations
Complex Ports: 2-4 Weeks
Enterprise-level complexity:
- Large number of lines (50+)
- Specialized telecommunications equipment
- Complex business accounts with multiple locations
- Numbers tied to PBX or legacy systems
What Affects Timeline
- Current carrier responsiveness: Some carriers process faster than others
- Accuracy of submitted information: Mistakes cause rejections and restarts
- Type of number: Landline, mobile, and VoIP may have different processing times
- Number of lines: More lines = more complexity